This article describes how to set up a video source for your live stream event on Prekindle. It is important to get familiar with this information well ahead of your event's start time in case there are any difficulties getting set up.
Basic Requirements
To broadcast a live stream the minimum you need is an Internet connection, some sort of camera, and a software app called an encoder. We will suggest which encoder application you should use, as it will depend on the type of camera and/or computer you have. You can also use the Zoom video conferencing app as your source. The most important things to check ahead of time are:
- Make sure your Internet connection supports upload speed of at least 5 megabits per second (Mbps), as indicated by a speed test run from your intended broadcast location on the device you intend to use. Download speed is not important. NOTE: You should use a hardwired Ethernet connection if at all possible. WiFi is generally not reliable enough to support uninterrupted video streaming.
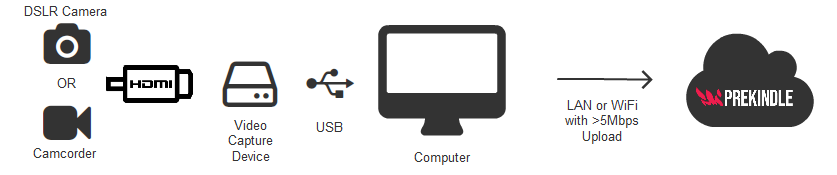
- If you plan to use an external DSLR camera or Camcorder you must have a Video Capture Device that accepts your camera's input (typically HDMI) and converts it to a USB connection usable by your computer. There are dozens of models available online, any one that accepts your camera's input and can output 720p or 1080p at a minimum of 30 frames per second will work.
Prekindle live streaming supports these three common setups:

See the sections below for details on how to set up each of these configurations. Multiple camera setups are supported but require professional video engineering skills and are beyond the scope of this article.
Webcam Setup
Follow these instructions if you have a desktop or laptop computer that has an integrated webcam, or if you are plugging a USB webcam or GoPro camera into your computer.
You already have all the hardware you need. All that's left to do now is set up the encoder software. Prekindle recommends OBS Studio for video stream production. It is a high-quality, free, open source application available for Windows, Mac, and Linux. Download and install OBS Studio on your computer then follow these steps:
- Launch OBS Studio.
- Open the Settings dialog by clicking Settings in the lower right.
- On the Stream tab, confirm these settings:
- Set Service to "Custom..."
- Set Server to the stream URL from the Prekindle dashboard
- Set Stream Key to the stream key from the Prekindle dashboard
NOTE: the Server and stream key will be different for every event! - Ensure Use Authentication is not checked.
- On the Output tab, confirm these settings:
- Set Output Mode to Advanced
- Set Encoder to x264
- Ensure Rescale Output is not checked.
- Ideally you should adjust your bitrate to be somewhat less than your upload speed indicated in your speed test. Remember 1000 Kbps = 1 Mbps
- On the Audio tab, confirm these settings:
- Set Sample Rate to 44.1 kHz
- Set Channels to Stereo
- On the Video tab, confirm these settings:
- Set both Base (Canvas) Resolution and Output (Scaled) Resolution to either 1280x720 for medium bandwidth or 1920x1080 if you have plenty of upload speed.
- Set the FPS selector to "Common FPS Values" and set its value to 30.
- Click OK to save your settings and dismiss the dialog.
- See the section below entitled Setting Up OBS Studio Scenes and Sources below to configure your camera, microphone, and optionally any pre-roll, trailer, or advertisements.
- When you are ready, click the Start Streaming button in the lower right. If you see a green light in the far lower right corner the stream is connected and will begin broadcasting shortly.
- When your event is finished, simply Exit the program.

Mobile Setup
If you plan to use your mobile device as your camera you need to install a specialized app for video streaming. Any app that can produce video output in the RTMP_PUSH format will work. Setup is different for each app, you will have to familiarize yourself with your app's settings and controls. Locate the settings for RTMP URL and Stream Key and enter these values from your event's LIve Streaming tab on the Prekindle dashboard.
For iOS, we recommend the Wirecast Go or Larix Broadcaster apps.
For Android, we recommend the Larix Broadcaster app.
External Camera Setup
The main difference between the external camera setup and the webcam setup is connecting the hardware. Typically you should have a HDMI output coming out of your camera. This needs to be connected to a video capture device, which is a small piece of hardware or a dongle that converts your camera's video signal into a format that your computer can use. The video capture device should then be connected via USB to your computer. This will cause your camera to appear to your computer like a webcam. From here, simply follow the instructions for setting up OBS Studio from the Webcam Setup section.
You may have to review your camera's menu options to turn off any heads-up/overlay info that the camera may be adding to the video.
If you intend to use a Canon EOS series DSLR camera you may be able to use Canon's EOS Webcam Utility to get around the need for a video capture device. Using this tool your camera will appear to your encoder as a USB webcam.
Zoom Setup
The Zoom video conferencing app has everything you need built-in to stream your meeting or panel discussion. Their documentation describes how to set this up on the Zoom side, specifically see the section titled Setting Up Custom Live Streaming (Host).
Setting up OBS Studio Scenes and Sources
OBS organizes output into "Scenes," which you switch between manually during your broadcast. You set up a Scene for each segment of your show that has a different source.
For example, you may want to show a welcome graphic, followed by a pre-roll video, followed by your live presentation. In this case, you would set up three separate Scenes, each with a different source.
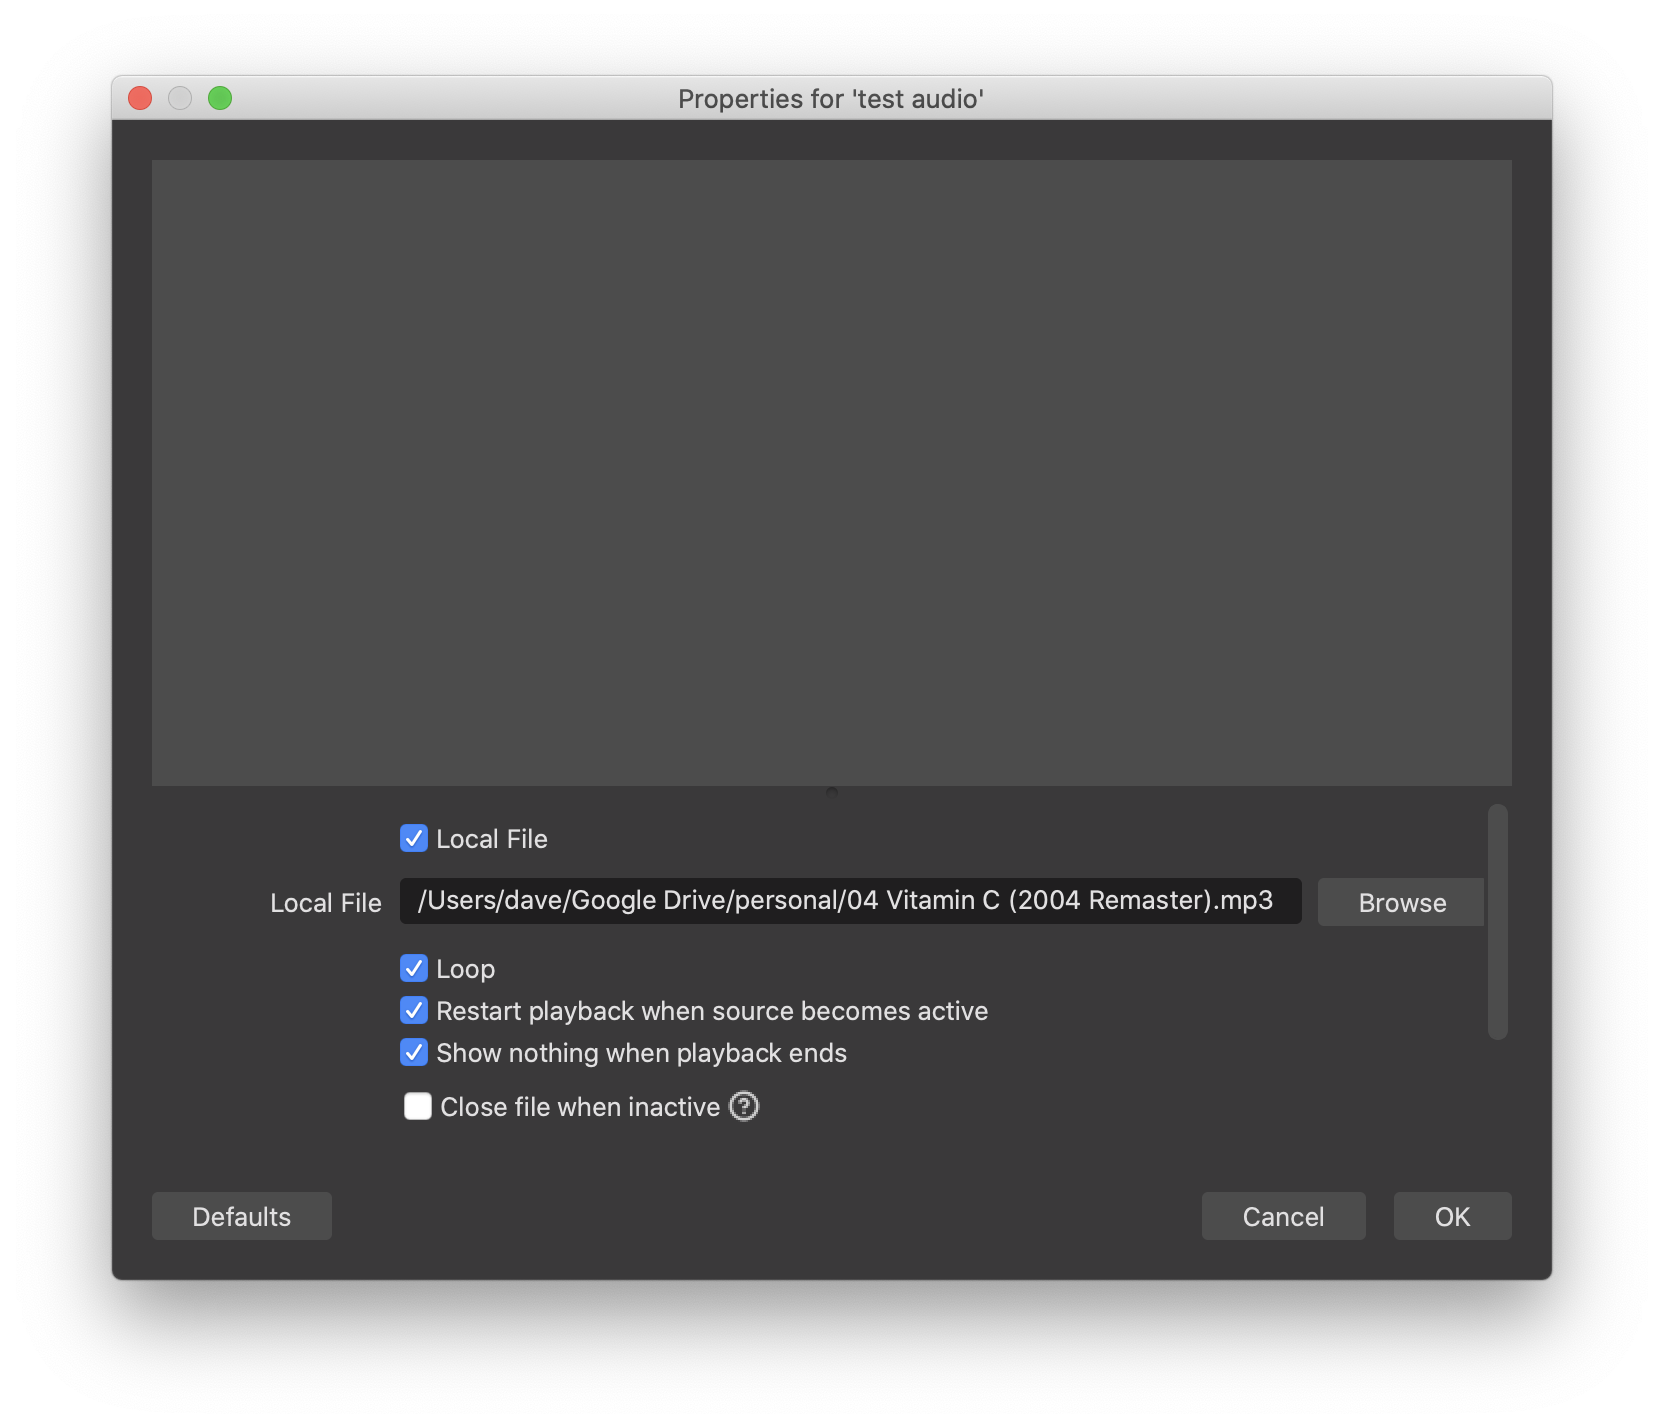
- For the welcome graphic, add a Scene using the + (plus) button in the lower left corner under the Scenes list. Give it a name like "Welcome Graphic". Then, under Sources (to the right of Scenes) use the + (plus) button there to add your graphic. Use type "Image" and find the graphic on your hard drive. You can add a second Source to add audio to your still image from a sound file or MP3. Use the plus button under Sources to add a second Source of type "Media Source" and find the audio file on your hard drive.

- For the pre-roll video, add another Scene using the + (plus) button. Give this Scene a name like "Pre-roll video." Notice that the Sources list has cleared out. Each Scene has its own set of Sources. Use the plus button under Sources and select type "Media Source." Then, find the video on your hard drive. You should set this video to not play on a loop unless this is your intention.
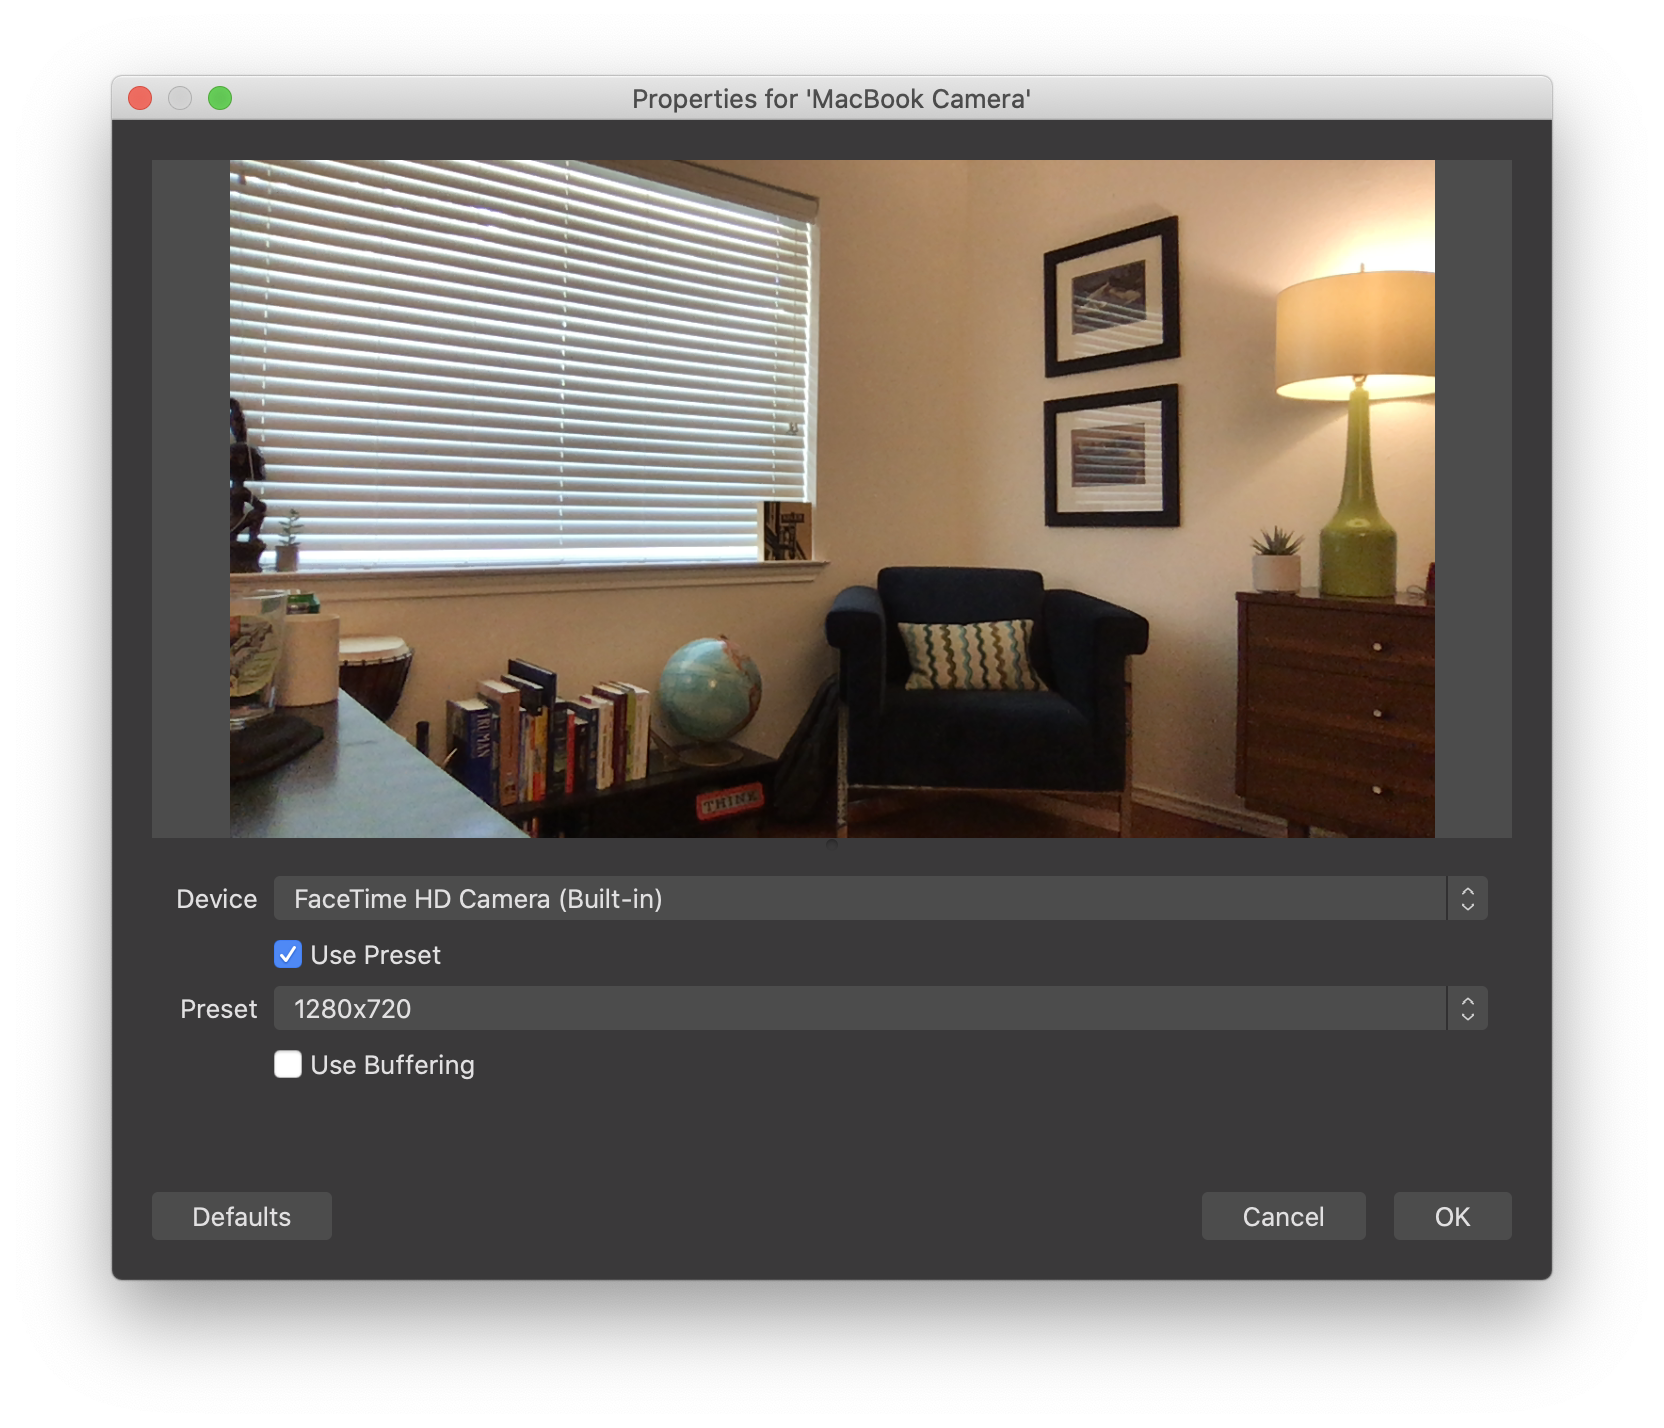
- For the live video segment, add another Scene called "Live Video" and add a Source to that using the type "Video Capture Device." Your built-in, USB, or external camera should appear as an option when you use this type.
You should order the Scenes in the order you intend to present them. You will manually click on the Scene that should be showing when appropriate. You can customize the transition effects between Scenes to suit your taste.