Scan Groups allow you to create custom scanning access for an event. By assigning specific ticket types to a Scan Group, you can control which tickets are accepted by a particular scanner or entry point.
This is especially helpful when your event has separate entrances, ticket types, arrival times, or access areas.
How Scan Groups Work
A Scan Group contains a selected set of ticket types from an event.
When the mobile entry app or scanner is logged into that Scan Group, it will only accept tickets included in the group. Any ticket that is not included will be rejected, allowing your team to redirect the guest to the correct entrance or scanning location.
Scan Groups do not change the guest’s ticket. They simply control which tickets can be accepted on a specific scanner.
Common Uses for Scan Groups
Scan Groups can be used for a variety of event-entry needs, including:
VIP Entry
Create a Scan Group containing only VIP ticket types and use it at a dedicated VIP entrance.
Table or Reserved Group Entry
Direct guests with table, suite, cabana, or reserved-group tickets to a separate line.
Multiple Entry Times
Create different Scan Groups for tickets with specific arrival or entry windows.
For example:
- Early Entry
- General Entry
- Late Entry
Festivals and Multi-Area Events
Use different Scan Groups for specific entrances, stages, campgrounds, parking areas, or restricted sections.
Staff, Vendors, or Credentialed Guests
Create a separate scanning location for staff passes, vendor credentials, media passes, or other specialized access types.
Setting Up a Scan Group
When creating a Scan Group:
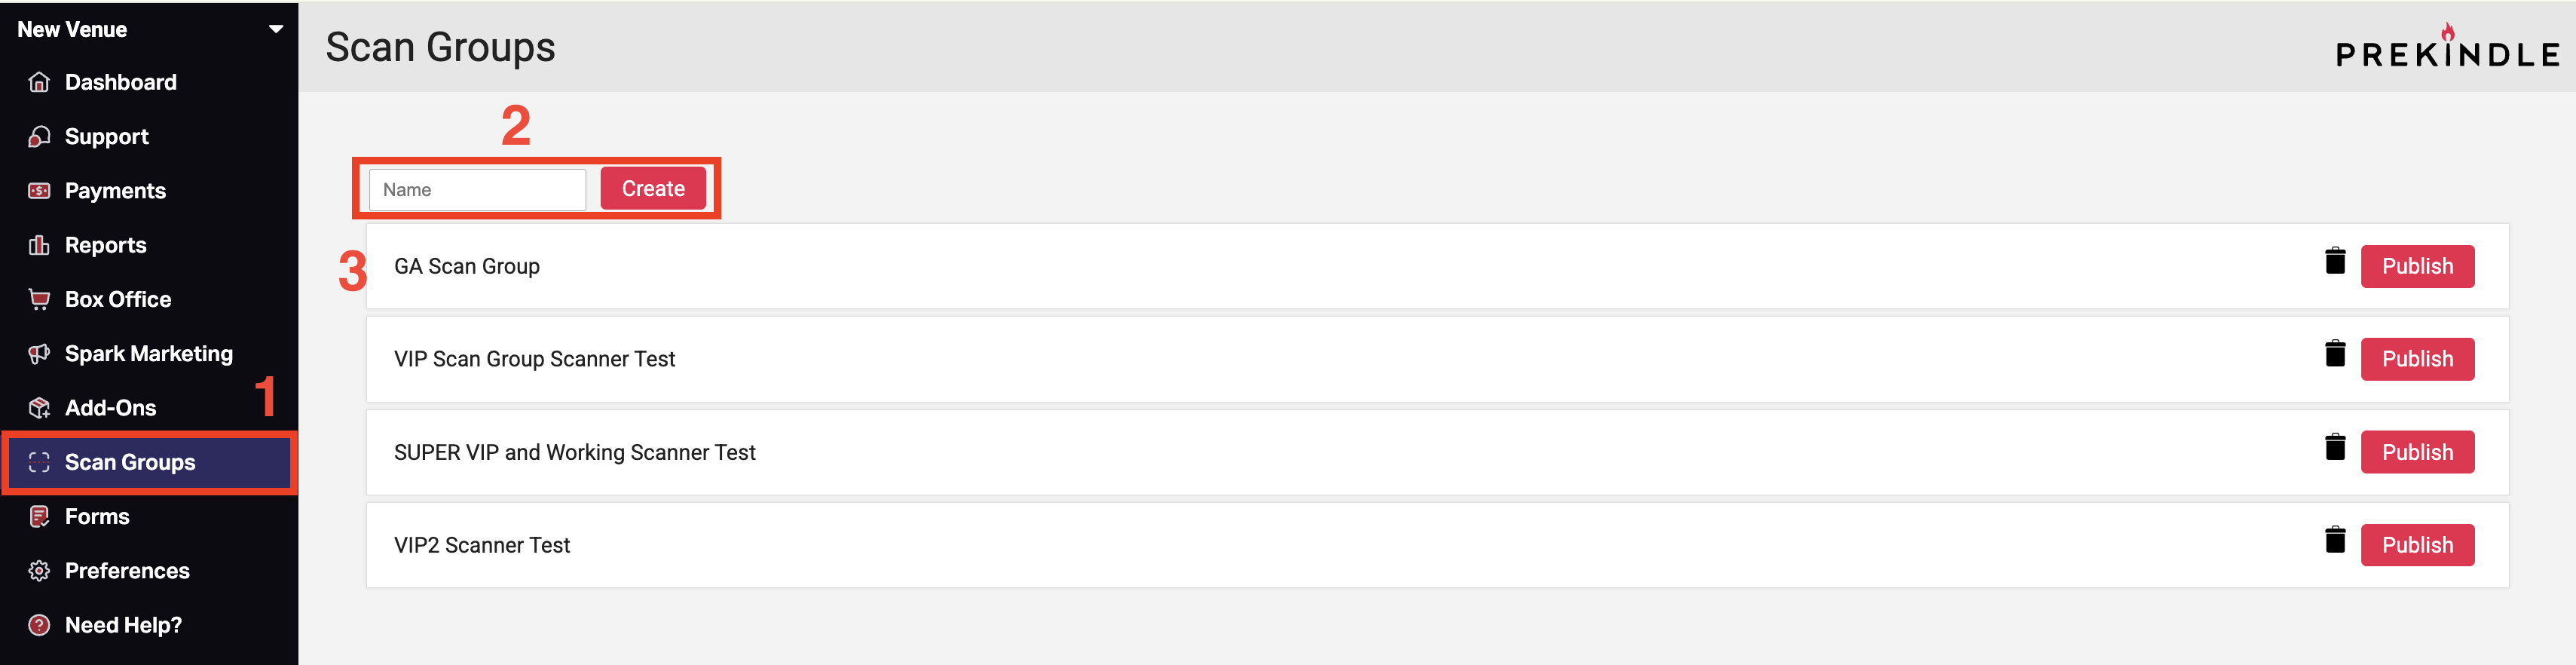
- Click Scan Groups in the left-side navigation panel.
- Enter a name for the Scan Group, then click Create.
Tip: Choose a distinct name that is different from the event name so the Scan Group is easy to identify within the event list. For example, use Date:VIP Entrance or Date:Table-Only Entry instead of repeating the event name.
Click the newly created Scan Group to expand it.
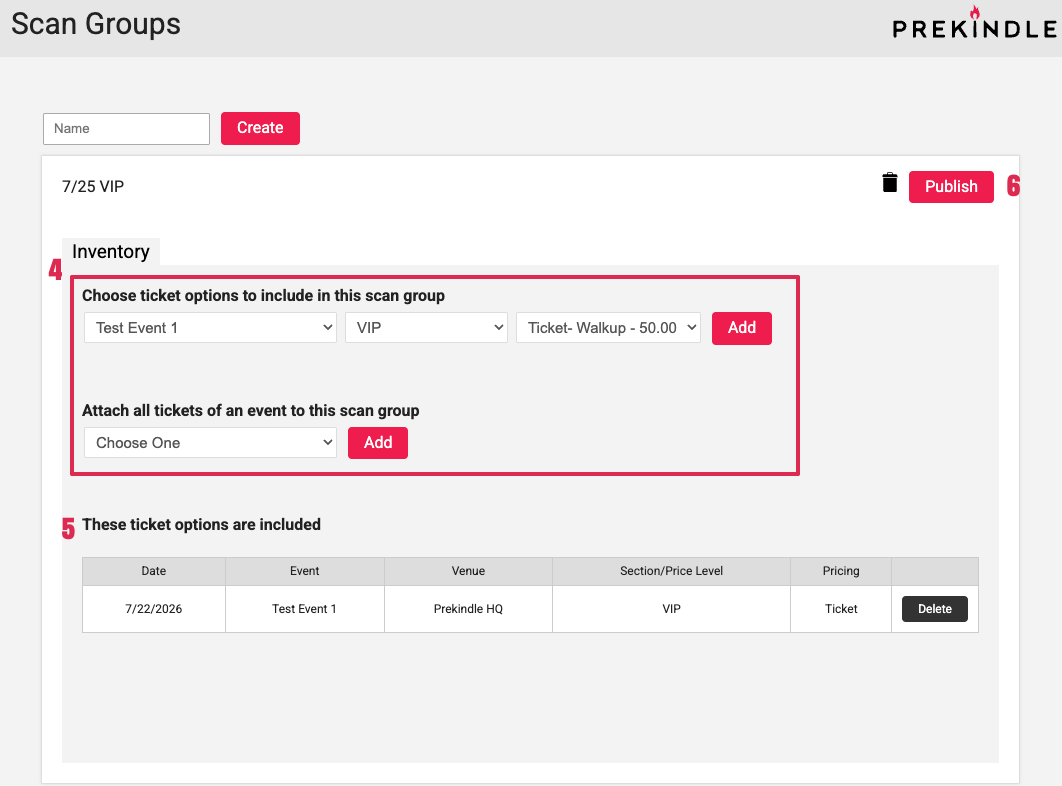
Choose how you would like to add tickets:
Add specific ticket types or pricings
Select the ticket options you want to include, then click Add. Continue adding tickets until the Scan Group includes all applicable ticket types and pricings.
Be sure to include every pricing under a ticket type when you want the entire ticket type to be accepted. For example, if a ticket type includes Adult, Child, and Early Bird pricings, each applicable pricing must be added.
OR
Add all tickets from an event
Select the option to add all tickets from the event, then click Add.Review the tickets included in the Scan Group to confirm everything is correct.
Click Publish when you are finished setting up the Scan Group.
Using a Scan Group Onsite
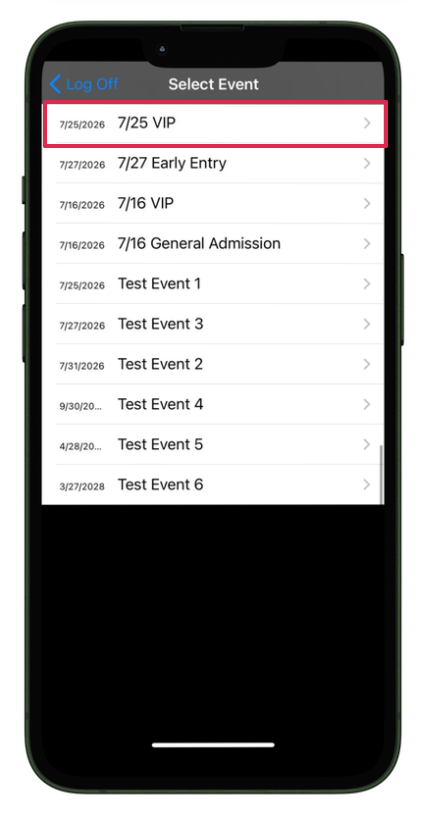
- On your scanner or personal device, log in to the Prekindle iOS mobile entry app.
- Find the scan group you'd like to use in the list of events and scan groups provided and
- Once scanning begins, the scanner will accept tickets included in the Scan Group and reject tickets outside of the group.
Best Practices
Keep Scan Groups Simple
Only include the ticket types that should be accepted at that specific entrance or access point.
Include All Pricings
Be sure you go back and add any new prices that may have been created after the scan group was created. Scan groups do not automatically sync new prices.
Use Clear Names
Avoid generic names such as “Group 1” or “Scanner Group" or the Event Name. Use names that describe exactly where or how the group should be used.
Brief Your Onsite Team
Make sure staff know:
- Which scanner belongs at each entrance
- Which ticket types should be accepted
- Where to redirect guests with other ticket types
- Who to contact if a ticket needs additional review
Test Before Doors Open
Confirm that eligible tickets are accepted and ineligible ticket types are rejected before guest entry begins. You can always Reactivate tickets in the Box Office tools so they will re-admit when the guests arrive.
Manage Scan Group Changes Manually
Scan Groups do not activate, switch, or expire automatically based on a scheduled time. Your onsite team must manually log scanners into the appropriate Scan Group and manually change the Scan Group whenever access rules need to change.
Was this article helpful?
That’s Great!
Thank you for your feedback
Sorry! We couldn't be helpful
Thank you for your feedback
Feedback sent
We appreciate your effort and will try to fix the article